
Most CPG founders treat print-ready design as a final checkbox, a quick formatting step before sending files to the printer. This misconception costs brands thousands in reprints, delays product launches, and undermines shelf impact. Print-ready design is actually a technical discipline that bridges creative vision with manufacturing reality. Understanding these print-ready packaging requirements transforms packaging from a cost center into a competitive advantage. This guide reveals what makes packaging truly print-ready and why mastering these essentials directly impacts your bottom line and brand perception.
Table of Contents
- Key takeaways
- Understanding print-ready design basics
- Why print-ready design matters for CPG packaging success
- Common challenges and how to ensure your design is truly print-ready
- Integrating print-ready principles into your packaging design workflow
- Optimize your packaging design process with OffCut
- FAQ
Key Takeaways
| Point | Details |
|---|---|
| Print ready basics | Preparing packaging files to exact printer specifications ensures the design translates correctly to physical packaging. |
| Core technical elements | Bleed three millimeters, trim marks, CMYK color, 300 DPI, and PDF X 1a packaging files form the foundational standards your files must meet. |
| Fonts and image quality | Embed or outline fonts to prevent substitution and use high resolution imagery to avoid blur in print. |
| Color and design workflows | Use CMYK color management and vector graphics to ensure sharp, consistent results across substrates. |
Understanding print-ready design basics
Print-ready design means preparing digital packaging files to exact printer specifications so your vision translates flawlessly to physical product. This goes far beyond exporting a pretty mockup. Your files must include precise technical elements that account for how printing presses cut, fold, and reproduce color on various substrates.
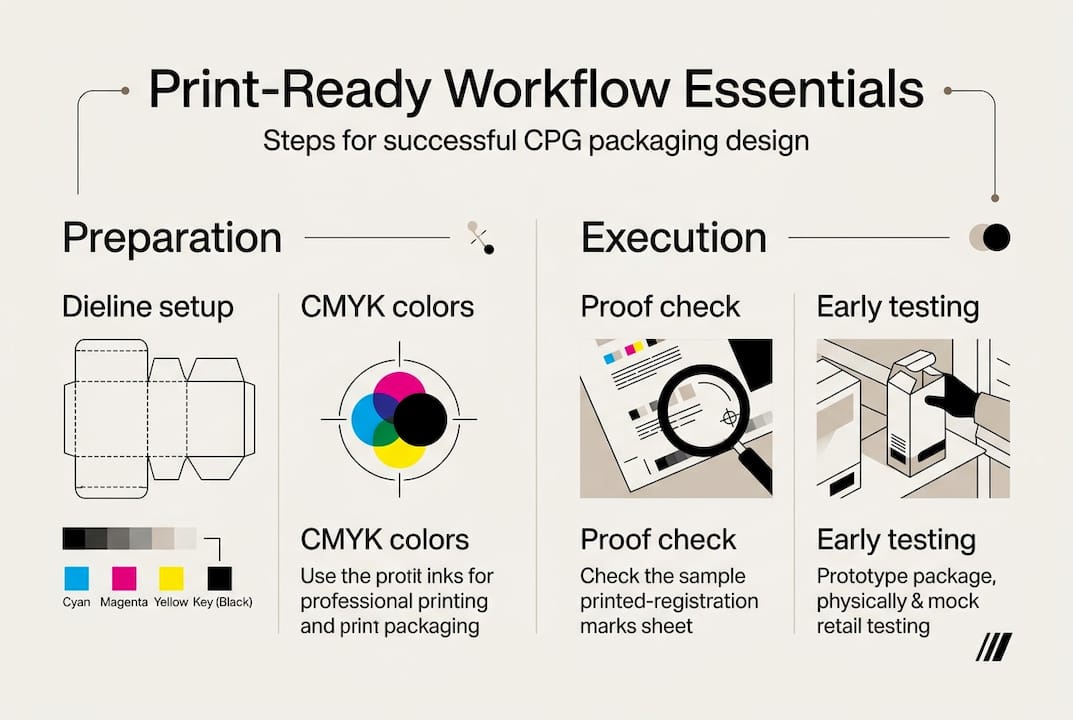
The technical foundation starts with five critical elements. Bleed extends your design 3mm beyond trim lines so no white edges appear after cutting. Trim marks show exactly where the printer cuts your packaging. Color profiles convert your design to CMYK because printers use cyan, magenta, yellow, and black inks, not the RGB light your screen displays. Resolution must reach 300 DPI minimum so images stay sharp at actual size. File formats like PDF/X-1a package everything correctly for professional printing equipment.
Creative decisions also determine print success. Embedded fonts prevent text from shifting or disappearing when printers open your files. Image quality matters because low-resolution photos look crisp on screens but print as blurry messes. Vector graphics scale perfectly while raster images pixelate if enlarged. Spot colors like Pantone ensure brand colors match exactly across print runs. Overprint settings control how overlapping elements interact on press.
Common pitfalls derail even beautiful designs:
- Using RGB color mode instead of CMYK creates unexpected color shifts
- Forgetting bleed zones results in white borders after cutting
- Placing critical text or logos inside the safety margin risks trimming them off
- Saving in wrong formats like PNG or JPEG loses essential print data
- Not converting text to outlines causes font substitution errors
Professional designers use Adobe Illustrator for vector packaging, Photoshop for image editing, and InDesign for multi-page layouts. Each tool serves specific print-ready functions. Illustrator creates dielines and structural packaging elements. Photoshop optimizes photos at correct resolution and color profiles. InDesign assembles complex packaging with multiple panels while managing bleeds automatically. Understanding these basics helps you communicate effectively with designers and printers, avoiding the translation errors that cause expensive delays.
Why print-ready design matters for CPG packaging success
Proper print-ready files directly impact your profitability and brand perception. When packaging files lack correct specifications, printers must stop production to request corrections. This delays your launch by days or weeks while competitors gain shelf space. Worse, printing with flawed files produces packaging with color mismatches, blurry images, or misaligned cuts. You either accept substandard packaging that undermines brand trust or pay for expensive reprints that destroy margins.

Shelf impact determines whether consumers choose your product over competitors in those critical three seconds of attention. Print quality affects this decision more than most founders realize. Sharp images and accurate colors signal premium quality and attention to detail. Blurry printing or color shifts communicate carelessness and erode trust before customers even read your copy. Professional print-ready design ensures your packaging delivers the visual impact your brand strategy demands.
Phygital marketing synergy amplifies when print and digital design work together seamlessly. Consumers research products online then buy in stores, or vice versa. When your packaging colors, fonts, and imagery match your website and social media exactly, you build recognition and trust. This consistency requires print-ready files with proper color management so physical packaging reflects digital brand assets accurately. Integrated design strengthens brand memory and purchase intent across all touchpoints.
Testing validates design choices before committing to production:
- Eye-tracking studies reveal which packaging elements capture attention on shelf
- A/B testing compares design variants to identify higher-performing options
- Focus groups provide qualitative feedback on messaging and appeal
- Shelf simulation tests evaluate visibility among competitor products
Data from these methods guides refinements to maximize impact. Only 37% of CPG redesigns improve sales, especially when early testing and objective metrics guide print design. Brands that test prototypes and iterate based on evidence dramatically outperform those relying on subjective opinions.
"The most successful packaging redesigns combine creative excellence with rigorous testing and flawless print execution. Technical print readiness isn't a constraint on creativity; it's the foundation that brings creative vision to life consistently and cost-effectively."
Investing in proper print-ready design from the start prevents the cascading costs of errors. A $500 design investment that ensures print readiness saves $5,000 in reprints, $10,000 in delayed revenue, and immeasurable damage to brand perception. This foundation supports both immediate launch success and long-term boost consumer appeal with packaging design strategies. Understanding these connections helps you prioritize print readiness as strategic investment rather than technical afterthought. Following a proven step by step packaging design process ensures quality outcomes.
Common challenges and how to ensure your design is truly print-ready
Founders and brand managers encounter predictable obstacles when preparing packaging files for production. Incorrect color profiles top the list because designers often work in RGB for screen display while printers require CMYK. This mismatch causes vibrant blues and greens to shift muddy or dull when printed. Missing bleeds create white borders after cutting because the design stops exactly at trim lines instead of extending beyond. Low resolution images look acceptable on screens at 72 DPI but print as pixelated disasters without 300 DPI quality.
Unsynchronized dielines cause catastrophic failures. The dieline is the structural template showing where packaging folds and cuts. When design elements don't align precisely with dielines, critical information gets trimmed off or appears in wrong locations after assembly. Text crossing fold lines becomes illegible. Logos positioned incorrectly lose impact. These errors only become visible after expensive printing, when fixing them requires complete reprints.
Verify print readiness with this systematic checklist:
- Confirm all images are 300 DPI or higher at actual print size
- Check color mode is CMYK throughout, with Pantone spots defined correctly
- Verify bleed extends 3mm beyond all trim edges
- Ensure critical elements stay 3mm inside trim lines (safety margin)
- Convert all text to outlines or embed fonts properly
- Align design elements precisely with provided dielines
- Save final files as PDF/X-1a or printer-specified format
- Include crop marks, bleed marks, and color bars if required
- Review file at 100% zoom to catch quality issues
- Request a digital proof from your printer before full production
Communication prevents most print-ready problems. When you brief designers effectively, specify your printer's exact requirements upfront. Different printers have varying specifications for bleed, color profiles, and file formats. Providing these details in your initial brief ensures designers build files correctly from the start rather than retrofitting later. Ask your printer for their specification sheet and share it with your design team immediately.
Pro Tip: Always request a physical proof print before authorizing full production runs. Digital proofs on screen cannot reveal how inks interact with your substrate or how colors shift under store lighting. A physical proof printed on actual packaging material shows exactly what thousands of units will look like. This $50-200 investment catches errors that would cost thousands to fix after production.
Hidden costs multiply when print files fail quality checks. Reprints obviously cost money for materials, printing, and shipping. Delays cost more through lost sales, missed seasonal windows, and competitor advantages. Rushed corrections to meet deadlines force premium pricing from printers. Substandard packaging that passes quality checks but looks mediocre costs most through reduced sales and damaged brand perception. Proper file setup and quality control guidance from the beginning prevents these cascading expenses.
Objective metrics and early testing improve the success rate of print-ready packaging redesigns significantly. Testing reveals issues while fixes remain inexpensive. Validating design choices before finalizing print files ensures your investment produces measurable results rather than expensive mistakes.
Integrating print-ready principles into your packaging design workflow
Most CPG brands treat print preparation as a final step after creative work finishes. This traditional approach creates bottlenecks, surprises, and expensive revisions. The integrated approach embeds print-ready standards from initial concepting through final production, transforming packaging development from linear process to collaborative system.
Typical workflow stages progress through concept, design development, refinement, print preparation, and production. In traditional workflows, designers focus purely on aesthetics during early stages without considering print constraints. Print specs get addressed only when creative approval completes. This causes painful discoveries like "that gradient won't print correctly" or "we need to simplify this illustration" after stakeholders already approved designs. Revisions restart approval cycles and delay launches.
Integrated workflows involve print considerations from day one:
| Traditional Approach | Integrated Approach |
|---|---|
| Designer creates concepts without print specs | Designer receives printer specs with initial brief |
| Print requirements addressed after creative approval | Print constraints inform creative decisions throughout |
| Revisions required when designs fail print checks | Designs built print-ready from first draft |
| Linear handoffs between roles create delays | Parallel collaboration between designers and production |
| Surprises emerge late in process | Issues caught and resolved early when fixes are cheap |
| Time to market: 8-12 weeks typical | Time to market: 5-8 weeks with fewer revisions |
Early collaboration between brand managers and designers on print specs prevents most problems. Share your printer's requirements during kickoff meetings. Discuss substrate choices, printing methods, and finishing options before concepting begins. This context helps designers create ideas that work beautifully both creatively and technically. When everyone understands constraints upfront, creative solutions emerge that leverage print capabilities rather than fighting them.
Pro Tip: Schedule print proof checkpoints at 50% and 90% completion, not just at final delivery. The 50% checkpoint catches major issues like color profile problems or resolution shortfalls while significant design work remains. The 90% checkpoint verifies details like bleed, trim, and dieline alignment before final approval. These staged reviews prevent last-minute surprises that force rushed fixes or compromise quality.
This integration supports faster market launch by eliminating revision loops. When designs are print-ready throughout development, final files go straight to production after approval. No waiting for print preparation means products reach shelves weeks earlier. Reduced costs come from avoiding reprints, rush fees, and extended design hours fixing preventable problems. Following proven packaging design workflow steps ensures quality outcomes efficiently.
The strategic advantage extends beyond individual projects. Teams that master integrated workflows build institutional knowledge about what works in production. Designers learn to create print-ready concepts naturally. Brand managers develop intuition for feasible requests. Printers become trusted partners rather than vendors who deliver surprises. This expertise compounds across projects, making each successive packaging initiative faster, cheaper, and more effective. Understanding the packaging concept creation process helps align creative vision with production realities from the start.
Optimize your packaging design process with OffCut
Navigating print-ready design requirements while managing creative vision and budget constraints challenges even experienced CPG leaders. OffCut streamlines this complexity by connecting you with expert designers who understand both creative excellence and technical print specifications. Our marketplace features packaging concepts that meet professional print-ready standards, eliminating the guesswork and revision cycles that plague traditional design processes.
Every design on the OffCut platform comes from professionals familiar with CMYK color profiles, bleed zones, dieline alignment, and proper file formats. This expertise ensures concepts you license arrive ready for production without expensive technical corrections. Whether you need fresh packaging ideas or want to monetize unused designs, OffCut provides the infrastructure to make packaging development efficient and cost-effective.
Explore our packaging design services with OffCut to discover how buying proven concepts at a fraction of agency costs accelerates your time to market while maintaining the technical quality that prevents production headaches. Transform your packaging projects from stressful unknowns into predictable successes.
FAQ
What is the difference between a print-ready design and a digital design?
Print-ready designs are final files formatted for accurate physical printing, typically in CMYK color mode with bleed zones, trim marks, and embedded fonts at 300 DPI resolution. Digital designs focus on screen display using RGB color, often at lower 72 DPI resolution with different file specifications optimized for web or app use. The two formats serve different purposes and require distinct technical preparation, though integrated branding ensures visual consistency across both mediums.
How can early testing improve the success of print-ready packaging?
Testing validates design choices to better capture consumer attention and build trust before committing to expensive production runs. Eye-tracking and A/B methods increase packaging redesign success rates by providing objective data about what actually works on shelf rather than relying on subjective opinions. This evidence-based approach helps refine print packaging while changes remain inexpensive, dramatically improving the probability your redesign drives sales growth instead of becoming part of the 63% that fail to improve performance.
What are the most common mistakes that prevent a design from being print-ready?
Using RGB color mode instead of CMYK causes unexpected color shifts when files reach printing presses. Missing or inadequate bleed and trim marks result in white borders or misaligned cuts after production. Low image resolution creates blurry, pixelated prints that undermine brand perception. Not embedding fonts properly causes text to shift or disappear when printers open files. Misaligned dielines lead to critical elements being trimmed off or appearing in wrong locations after packaging assembly, requiring expensive reprints to fix.
How does OffCut help CPG brands with print-ready design?
OffCut connects CPG brands with expert designers who understand both creative packaging and technical print-ready requirements like color profiles, resolution, and file formats. The OffCut packaging design marketplace provides a streamlined process for licensing professional packaging concepts that arrive ready for production without additional technical corrections. This eliminates the revision cycles and print preparation delays that typically plague packaging projects, helping brands launch products faster while controlling costs and ensuring quality outcomes.