
TL;DR:
- Properly prepared print files require specified resolution, color profiles, bleed, dielines, and compliance layers.
- Establishing a central, version-controlled repository for regulated copy and assets reduces errors and ensures compliance.
- Building structured workflows and asset management systems is key to consistent, scalable, packaging success.
Your first product run is ready. The design looks brilliant on screen. Then the printed boxes arrive and a color is wrong, the barcode is unreadable, or worse, the ingredient list is from an old formula. Now you're looking at a reprint bill, a delayed launch, and a compliance headache that your retail buyer won't forget. This scenario plays out across CPG brands every year, and it almost always traces back to packaging file preparation. This guide walks you through exactly what you need to build, check, and export print-ready packaging files that survive contact with real production environments.
Table of Contents
- Understand print-ready requirements
- Gather your tools and assets
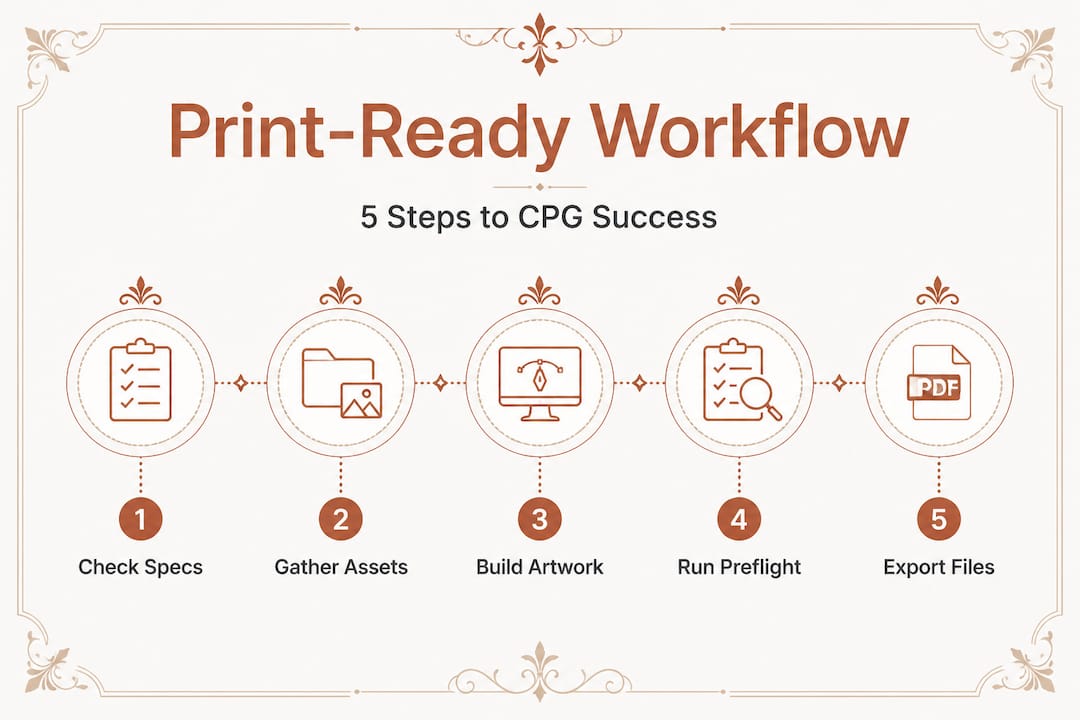
- Step-by-step: How to set up and export packaging files
- Troubleshooting and quality checks
- What most guides miss about packaging file preparation
- Ready for packaging files that drive results?
- Frequently asked questions
Key Takeaways
| Point | Details |
|---|---|
| Start with compliance | Centralize regulated content to prevent costly legal or labeling errors. |
| Use approved templates | Always build on printer-supplied dielines and follow provided specs. |
| Check before print | Do a final preflight to catch low-res images, unembedded fonts, and misplaced compliance info. |
| Save versioned files | Archive changes and updates for each SKU or flavor to retain compliance and enable edits. |
| Workflow is king | A robust preparation workflow prevents errors and allows for growth as your product line expands. |
Understand print-ready requirements
"Print-ready" sounds simple, but in CPG packaging it covers a specific set of technical and regulatory conditions that your file must meet before it ever reaches a press. Getting fluent in these terms early saves you from expensive surprises.
Resolution refers to image quality, measured in dots per inch (DPI). Print requires a minimum of 300 DPI at final output size. Anything lower looks fuzzy on shelf. Color profiles determine how colors translate from screen to ink. Packaging files must be in CMYK (Cyan, Magenta, Yellow, Key/Black), the color model used by presses. RGB is for screens only and will shift dramatically in print. Bleed is extra artwork that extends beyond your final cut line, typically 0.125 inches on each side, ensuring no white edges appear if the cut drifts slightly during production. A dieline is the technical outline showing where your packaging gets cut, folded, and scored.
Understanding print-ready packaging essentials also means knowing the difference between raster and vector graphics. Logos and icons built in vector graphics for packaging scale to any size without losing crispness, which matters when your design lives on a 2-ounce pouch and a 12-ounce jar.
Compliance is just as critical as technical specs. The FDA and USDA require specific label elements, and your file needs to carry them accurately at every version. A single source of truth for regulated elements such as ingredients, nutrition facts, allergens, and lot codes ensures you never ship a technically beautiful file carrying outdated copy.
Here's a comparison of required file features and what happens if they're missing:
| Feature | Standard requirement | Impact if missing |
|---|---|---|
| Resolution | 300 DPI minimum | Blurry print, rejected by vendor |
| Color format | CMYK | Color shift, reprints required |
| Bleed | 0.125 in. on all sides | White edges on finished packaging |
| Dieline included | Correct, locked layer | Wrong cuts, structural failure |
| Compliance labels | Current, accurate copy | Regulatory fines, product recalls |
| Fonts outlined/embedded | All fonts converted | Text substitution, layout breaks |
Must-have compliance elements for regulated CPG categories include:
- Ingredient list (descending order by weight)
- Nutrition facts panel (FDA-compliant format)
- Allergen statement
- Net weight or net quantity
- Manufacturer name and address
- Country of origin
- Best by or lot code placement (if required)
- UPC/barcode (verified, scannable)
Pro Tip: Always confirm the printer's template and technical spec sheet before exporting your files. Printers differ on bleed size, file format preferences, and color profile requirements. One conversation before you start saves hours of rework.
Gather your tools and assets
Once you know what "print-ready" means, it's time to assemble all the tools, files, and templates you'll need before you start. Jumping into a design software without the right assets in hand is how small errors compound into big delays.
Your core asset list starts with packaging dieline blueprints sourced directly from your manufacturer or structural packaging vendor. A dieline that doesn't match the actual physical structure is worthless, no matter how good the design looks on it. Always request dielines in an editable vector format such as .ai or .eps.
Beyond the dieline, you'll need licensed, print-ready versions of all brand fonts, your logo in vector format, approved brand color swatches in CMYK values, all approved photography at 300 DPI, and the most current version of every regulated text element. For sourcing packaging design work, having a complete asset kit on hand also means any designer you bring in can move faster and with fewer errors.
Here's a practical tool breakdown for CPG packaging file preparation:
| Tool | Asset type | Typical source |
|---|---|---|
| Adobe Illustrator | Artwork, dielines, vector design | Creative team or agency |
| Adobe Acrobat | PDF preflight and proofing | Print vendor or in-house |
| Regulatory database | Compliance copy, ingredient data | FDA, USDA, legal team |
| Google Drive or Dropbox | Shared asset storage | Marketing or ops team |
| PLM software | Version control for regulated copy | Ops, compliance team |
| Project management tool | Workflow tracking, sign-off stages | Project manager |
Version control for regulated copy is where many brands fall apart. The labeling compliance requirements for ingredients, nutrition facts, allergens, and lot/expiry information must be locked, approved, and traceable, not floating across email threads. A central repository makes this manageable.
Version control options for your regulated CPG copy include:
- Google Drive with strict naming conventions and view-only sharing for approved files
- Dropbox Business with version history enabled
- Dedicated PLM tools (Product Lifecycle Management) like Arena or Propel for growing brands
- Shared master spreadsheet that links directly to the artwork file and tracks every revision with a date and approver name
Working from approved, current assets isn't just good practice. It's the layer of protection between you and a compliance audit.
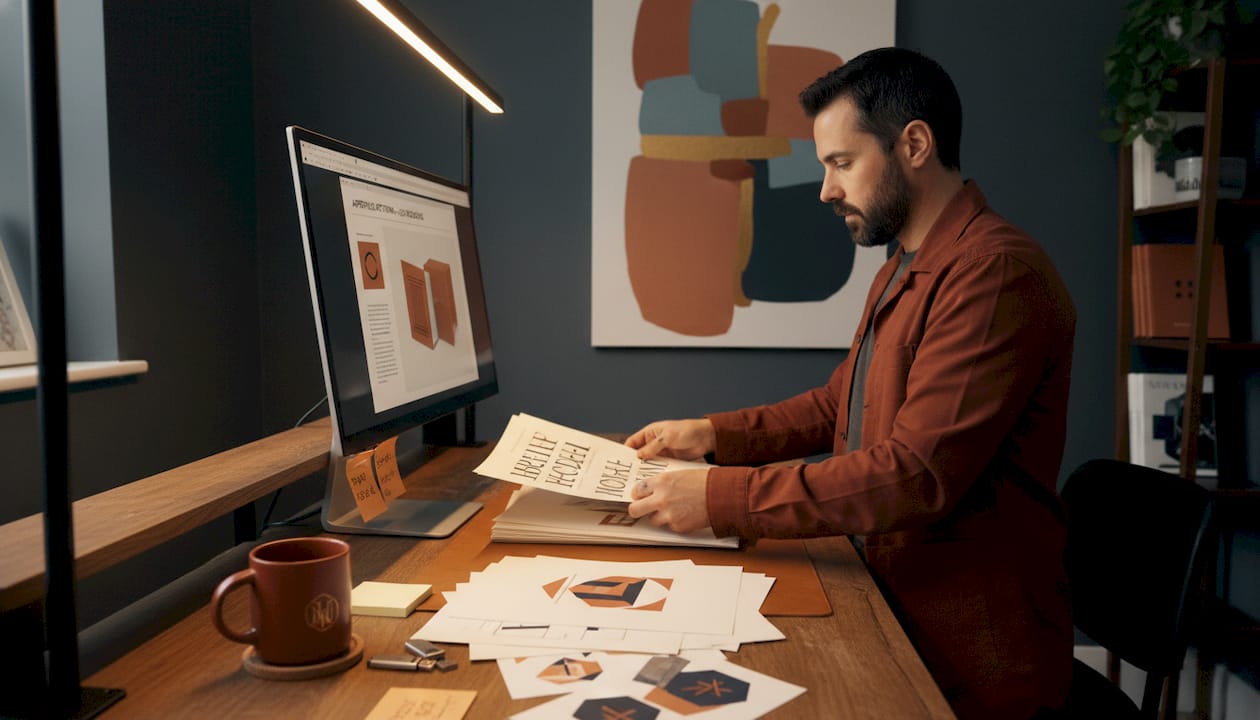
Step-by-step: How to set up and export packaging files
With your toolkit and templates ready, here are the practical steps to ensure your files are built for production and compliance. Following a consistent sequence is what separates brands that hit launch dates from those that miss them.
-
Open the correct dieline file directly from your manufacturer. Never work from a screenshot or an informal sketch. Confirm it matches the exact SKU dimensions and structure.
-
Set up your document in CMYK color mode from the start. If you build in RGB and convert later, color shifts are harder to catch and correct, especially in gradients and skin tones.
-
Build your layers logically. A standard layer structure for CPG packaging files includes: Dieline (locked), Safe Zone and Bleed Guides (locked), Compliance Text (locked after approval), Design Elements, and Images. Organized layers make handoffs faster and reduce errors.
-
Lock your regulated copy layer after legal or compliance sign-off. This includes ingredients, nutrition facts, allergen statements, net weight, and any other regulatory mandated text. A single unintentional edit to an allergen statement can trigger a recall.
-
Add your bleed and safe zones to all artwork. Extend backgrounds and patterns to the bleed line. Keep critical text and logos inside the safe zone, at minimum 0.125 inches from the cut line.
-
Verify every image is either vector or 300 DPI at final scale. Use the "Image Info" or "Document Info" panel in Illustrator to check. A hero image that looks sharp at 72 DPI on screen will print as a blurry mess.
-
Outline all fonts before export. Go to Type > Select All > Create Outlines. This converts text to vector paths so your printer doesn't substitute a different font. Save a working file with live text and a separate "for print" version with outlined fonts.
-
Run a final visual review at 100% zoom on every panel. Check for spelling errors, misaligned elements, and any compliance text that looks out of place or too small to be legible.
-
Export as PDF/X-1a unless your printer specifies otherwise. This format embeds all images and fonts, strips screen-only elements, and is the industry standard for print production. The step-by-step packaging design process is much smoother when your export settings are already defined.
Warning: Always lock compliance and regulated information before final export to avoid surprise audits or recalls. A file that's technically perfect but contains last season's ingredient list is a liability, not an asset.
Streamlining your packaging workflow strategies also means building export presets for each printer or SKU type. Once set, a preset applies all required settings in one click.
Pro Tip: Save export presets for each printer or SKU type to cut future setup time in half. If you work with multiple co-manufacturers or regional printers, each preset captures their unique requirements so nothing falls through the cracks between projects.
Troubleshooting and quality checks
After you've exported your packaging files, a final quality check prevents expensive mistakes and keeps your launches on track. Even experienced teams catch critical errors at this stage, which is exactly why this step exists.
The five most common errors CPG packaging files contain before production approval are:
- Missing or incorrect dieline: The dieline layer is hidden, on the wrong layer, or doesn't match the physical structure. The printer either rejects the file or cuts the packaging wrong.
- Misplaced or outdated compliance information: Nutrition facts or ingredients that don't match the current formulation, or regulatory copy that's positioned in the wrong panel. This is directly linked to recalls and enforcement actions.
- Unconverted fonts: Live text in the export means font substitution at the printer, which shifts your layout and can obscure required text.
- RGB or low-resolution images: Files that weren't properly converted from screen to print specs. Colors will shift, images will look soft, and your vendor may flag the file for rejection.
- Unlocked regulated copy: A compliance-approved block of text that got accidentally edited during a last-minute design tweak. This is more common than most founders realize.
Your pre-production checklist before sending files should cover:
- Color mode confirmed as CMYK (check Document Setup)
- Bleeds set correctly for all panels
- Dieline visible, on its own layer, and locked
- All fonts outlined
- All images embedded and linked files resolved
- Compliance text matches the currently approved version
- Barcode verified as scannable (request a verification scan if in doubt)
- Printer's proof reviewed and signed off
Working closely with your designer portfolio workflow also means knowing which checks fall to the designer and which fall to your brand or compliance team. Dividing responsibility clearly removes duplicate effort and gaps.
Pro Tip: Run a preflight check with your print vendor or a proofing tool before sending. Most professional printers offer preflight services that flag technical errors before plates are made. Using one adds a day to your timeline and can save you weeks of reprints and redesigns.
If you're also thinking ahead to end-of-life packaging considerations, reviewing how you've structured your artwork for packaging for recyclability early in the file prep stage avoids costly structural revisions later.
What most guides miss about packaging file preparation
Every packaging prep guide covers CMYK, bleed, and font outlining. Those are table stakes. What actually separates brands that scale smoothly from those stuck in endless reprint cycles is something most guides don't touch: process architecture.
Technical accuracy is a snapshot. Your packaging, however, is a living document. Formulations change. Regulations update. You expand into new regions with different labeling rules. A file that's perfectly print-ready today can become non-compliant in six months because an allergen threshold changed or your co-man swapped an ingredient. The version control standard for regulated CPG content isn't a nice-to-have. It's the backbone of a brand that won't ship an illegal product by accident.
We see this contrast clearly. Founders who obsess over the perfect artboard but email compliance copy back and forth in unlabeled Word docs are one missed revision away from a crisis. Founders who build a central, versioned repository for every regulated element, and connect it to a clear sign-off workflow, don't lie awake worrying about recalls. They just send their files.
The contrarian truth is this: spend less time perfecting individual files and more time building a system that makes every future file easier to get right. A central asset repository, auto-notifications when regulated copy changes, and a mandatory team sign-off before export eliminate the category of errors that are too expensive to fix after launch.
Repurposing packaging designs is also far easier when you've built a system that knows exactly which version of every element is current. Your assets become reusable building blocks instead of one-off exports that require a full audit before they can be touched.
Print-ready is a moving target. The brands that hit it consistently aren't the ones with the most talented designers. They're the ones with the most reliable process.
Ready for packaging files that drive results?
Getting your CPG packaging files truly production-ready takes more than design talent. It takes structured workflows, correctly sourced assets, and compliance confidence at every step.
Offcut exists to bridge that gap for founders who want professional, print-ready packaging without the agency price tag or the six-week timeline. At Offcut's packaging file services, you'll find exclusive, pre-built packaging concepts by professional designers that are structured for production from day one. Designers get paid for work that was already done. Founders get assets that are ready to adapt, review, and send to print. It's the fastest way to go from blank artboard to retail-ready packaging without risking a costly reprint.
Frequently asked questions
What file format do most packaging printers require?
Most packaging printers require files in PDF/X-1a or similar standardized PDF formats with outlined fonts and embedded images to ensure consistent output across different production environments.
How do I make sure my nutritional info and ingredients are current?
Keep all regulated text in a central, versioned document linked to your artwork file, with a clear approval workflow so outdated copy can never make it into a final export.
Should packaging artwork be in CMYK or RGB?
Packaging artwork must be in CMYK color mode for print accuracy; RGB is designed for screen display and produces unpredictable color shifts when converted to press inks.
Is a dieline the same as a template?
A dieline is the technical outline defining cuts and folds; a template typically includes the dieline plus safe zones and bleed guides to help designers place artwork correctly within structural boundaries.