
TL;DR:
- A structured, stage-gated client handoff creates accountability, ensures proper approvals, and prevents costly delays in packaging production.
- Gather all necessary signed approvals, correct files, and compliance documents before starting the handoff, verifying technical readiness and version control.
- Implement clear processes, consistent documentation, and centralized systems to streamline workflows, build trust, and scale efficiently with each package launch.
Your packaging files are done. The designer delivered the assets. Launch day is circled on the calendar. Then the printer calls: wrong color profile, missing bleed, no dieline confirmation, and now your product sits in a hold queue while competitors fill shelf space. This scenario plays out constantly in CPG because most founders treat the handoff as an afterthought rather than a structured phase of the design process. A stage-gated client handoff fixes that by creating accountability checkpoints, verified file packages, and clear roles before anything reaches production.
Table of Contents
- What you need before starting the client handoff
- Step-by-step approach to a seamless packaging client handoff
- How to package files and confirm technical print readiness
- Avoiding common handoff failures and ensuring accountability
- Why the right handoff unlocks more than just print-ready packaging
- Ready to simplify your packaging handoff process?
- Frequently asked questions
Key Takeaways
| Point | Details |
|---|---|
| Centralized approvals matter | A stage-gated handoff with explicit sign-offs reduces production errors and miscommunication. |
| Pre-flight is non-negotiable | Technical validation of files and specs must happen before sending anything to manufacturers. |
| Single source of truth | Centralized, version-controlled files ensure everyone acts on the latest and correct information. |
| Print-ready details | Manufacturers insist on strict file requirements, including correct bleed, safe zones, dielines, and embedded fonts. |
| Strategic handoff impact | A disciplined handoff process scales your brand’s trust, speed, and operational efficiency. |
What you need before starting the client handoff
With the stakes established, the next step is gathering everything necessary for a smooth and complete client handoff.
Before you even open a file-sharing folder, you need to confirm that all upstream decisions have been locked. A packaging handoff that starts without signed approvals is just a faster way to produce the wrong thing at full cost.
Documents and approvals to collect first:
- Signed creative brief with final artwork version clearly labeled
- Client approval record showing who approved what and when
- Decision log capturing every change made after the initial concept
- Compliance documents such as nutritional panel sign-offs, regulatory language, and barcode verification
- Printer or manufacturer specifications including substrate, print method, and color matching system
- Final dieline file from the structural or packaging engineer
According to packaging design best practices, a packaging handoff should follow a stage-gated workflow and include all sign-offs before files advance to production. That means no file leaves your hands without a paper trail showing it was reviewed and approved at every stage.
Version control is where most founders create the most problems. When designers save files as "final_v3_ACTUALLYFINAL_USE_THIS.ai," you have already lost the game. Centralized storage in a shared platform with named versioning solves this before it becomes a headache. Review your packaging file prep checklist to confirm nothing gets missed at this stage.
Comparison of common handoff tools
| Tool type | Founders typically use | Designers typically use |
|---|---|---|
| File storage | Dropbox, Google Drive | Adobe Creative Cloud, WeTransfer |
| Proofing and review | Email, PDF markups | Dedicated proofing platforms |
| Version tracking | Folder naming conventions | Layered file history in design software |
| Communication | Slack, email threads | Project management tools, design briefs |
| Approval records | Informal email sign-offs | Digital sign-off forms, audit logs |
The gap between what founders use and what designers use is exactly where handoffs break down. Bridging that gap with a shared, agreed-upon system before the handoff starts saves hours of back-and-forth. Integrating streamlined handoff workflows early in your product development cycle helps prevent these mismatches from compounding.
Pro Tip: Before you begin any handoff, send a one-page handoff summary to both the designer and the printer. List the exact file names, version numbers, approval dates, and the name of the person who gave final sign-off. This single step eliminates most miscommunications before they start.
Step-by-step approach to a seamless packaging client handoff
With your materials in place, here is a step-by-step roadmap for navigating the handoff process.
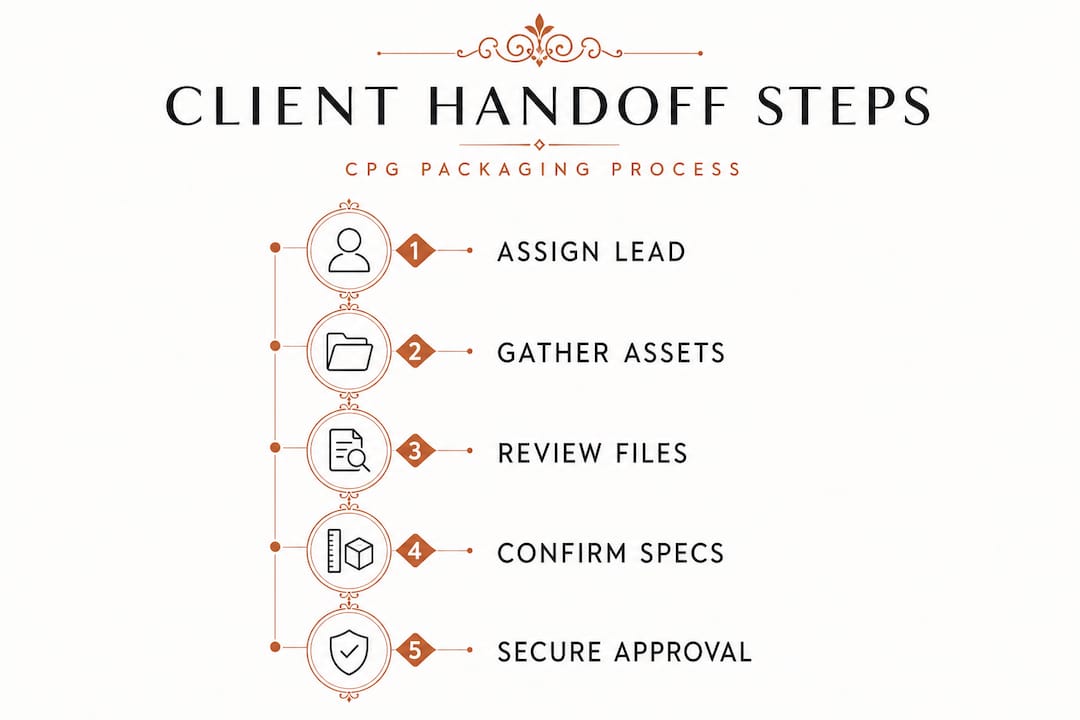
A structured handoff workflow is not bureaucracy. It is the difference between a product that hits shelves on time and one that burns cash in a revision cycle. Each step below has a clear owner and a required output, which makes accountability obvious.
The handoff sequence:
- Assign a handoff lead. One person owns the process. Not the team. Not "everyone." One person, typically the brand manager or founder, who is accountable for every file that moves forward.
- Confirm the single source of truth. Create one master folder or platform location where all final files live. Archive all earlier versions in a clearly labeled sub-folder so they are accessible but not confused with finals.
- Conduct the internal review. Before the client or printer sees anything, the designer and brand lead do a final review together. Every element, from pantone callouts to copy, gets confirmed against the approved brief.
- Obtain client sign-off. The client reviews the final artwork and signs off formally, not verbally. Use a dated record showing exactly what version was approved and by whom.
- Package the files for production. Collect all production-ready files, specs, and instructions into a structured handoff package. This is not just a zip folder. It is an organized set of materials with a cover sheet.
- Submit to pre-press review. The printer or manufacturer reviews the files before committing to a press run. Any pre-press issues get flagged and resolved before the job is scheduled.
- Archive the approved package. Once production is confirmed, the final package is archived with all corresponding approval records for future reference, reorders, or compliance audits.
As documented in production-ready design guidance, stage-gated handoffs include explicit approvals, archiving, and only release files to production at the final stage. That final stage gate is your insurance policy against reprints, delays, and margin erosion. Additionally, pre-press requirements specify precisely how art must be formatted before manufacturer handoff, which makes step five especially critical.
Handoff stage reference table
| Step | Owner | Required output |
|---|---|---|
| Assign handoff lead | Founder or brand manager | Named point of contact confirmed |
| Establish source of truth | Handoff lead | Master folder structure created |
| Internal review | Designer and brand lead | Annotated review with confirmed specs |
| Client sign-off | Client | Dated approval record with version number |
| File packaging | Designer | Organized handoff package with cover sheet |
| Pre-press review | Printer or manufacturer | Pre-press approval or flagged issue list |
| Archive final package | Handoff lead | Archived folder with all approvals attached |
This same logic applies whether you are launching a single SKU or building out a full product line. The earlier you institutionalize this sequence, the faster each subsequent launch moves. If you are still figuring out the full scope of your design process, the packaging workflow for startups guide maps the bigger picture alongside the handoff details.
Pro Tip: Always document what changed between versions, who requested the change, and when it was approved. Vendors and printers will sometimes ask why a spec looks unusual. Having that change history saves you from redoing proofs from scratch.
How to package files and confirm technical print readiness
Once the process flow is set, it is crucial to ensure your files are technically ready for production.

This is the section most founders skip or skim, which is exactly why incomplete or misconfigured files are among the top causes of costly production delays. Technical print readiness is not the designer's responsibility alone. As the founder, you need to understand what "print-ready" actually means so you can verify it, not just trust it.
Core print readiness specs to confirm before handoff:
- Color mode: All files must be in CMYK, not RGB. RGB is for screens, not presses. Even a single element left in RGB can shift dramatically when printed.
- Resolution: All embedded images must be at minimum 300 DPI at final print size. Lower resolution images look pixelated in print even when they look sharp on screen.
- Bleed: Artwork must extend beyond the cut line by at least 0.125 inches (3mm) on all sides to prevent white edges on the finished product.
- Safe zone: Keep all critical text and logos at least 0.125 inches inside the trim line so nothing essential gets cut during production.
- Dieline: The dieline must be on its own separate layer, clearly labeled, and in a spot color that will not print. Mixing the dieline with live artwork causes serious production errors.
- Fonts: All fonts must be outlined or embedded. Missing fonts shift to substitutes and destroy your layout.
- Linked files: All linked images and assets must be embedded or collected alongside the working file. A file that looks correct on the designer's machine but has broken links is useless to a printer.
Print-ready file specifications require CMYK color mode, proper bleed, correct dieline handling, embedded fonts, and 300 DPI resolution throughout. These are not preferences. They are production requirements.
"Validation of dieline orientation, proper bleeds, and safe zones is required before submitting artwork for production." — Brillpack, packaging artwork preparation
Treat template matching and printer-specific specs as core parts of the handoff, not optional extras. Every manufacturer has slightly different requirements for bleed widths, color profiles, and substrate handling. Getting those specs directly from your printer before the designer finishes the file saves you a revision cycle. Review affordable print-ready file strategies for practical ways to get this right without inflating your production budget, and follow dieline setup best practices to make sure your structural file is correct from the start. For an overview of the full technical picture, the print-ready design essentials guide covers every requirement in one place.
Pro Tip: Run a pre-flight check using your design software before submitting. Most professional applications include a built-in pre-flight tool that flags color mode errors, missing fonts, resolution problems, and broken links automatically. If your designer has not run this check, ask for a pre-flight report as part of the handoff package.
Avoiding common handoff failures and ensuring accountability
After covering technical preparation, founders should also attend to the human and process aspects of handoff integrity.
Even perfect files can create problems if the surrounding process has gaps. The most common handoff failures in CPG packaging are not technical. They are organizational. They come from version confusion, missing approvals, and untracked changes that leave everyone pointing fingers when something goes wrong.
Here is a practical set of steps to build accountability into your process:
- Establish one file naming convention and enforce it. Every file should follow the same structure, such as BrandName_SKU_Version_Date. No exceptions, no shortcuts.
- Log every approval with a timestamp and a name. Verbal approvals do not exist. If it is not written, it did not happen. Use email confirmation, digital sign-off tools, or even a simple shared document.
- Lock finalized files against editing. Once a version is approved and packaged, it should not be editable. Export to a locked format or clearly flag the folder as "do not edit."
- Assign a single point of contact for each stakeholder group. One person represents the brand. One person represents the printer. When issues arise, there is no confusion about who to call.
- Conduct a post-production review after the first run. Compare the printed product against the approved artwork. Note any discrepancies and update your spec documentation for the next run.
Centralized review and audit trails reduce duplicate feedback, prevent delays, and create compliance accountability. This matters more than most founders realize. When a retailer or certifier asks for documentation of your packaging approval process, a complete audit trail is the answer.
"Centralized proofing creates a single source of truth, eliminating the confusion of multiple email threads and mismatched file versions." — Ziflow, artwork approval process
The brands that struggle most with handoffs are the ones who treat each launch as a standalone event rather than a repeatable process. Building in traceability from the start means your fifth product launch is faster and cheaper than your first. Avoiding the most common packaging handoff mistakes is not about being overly cautious. It is about protecting your margin and your timeline. Pairing that with smarter design sourcing means you are building a process that scales alongside your brand.
Why the right handoff unlocks more than just print-ready packaging
Most packaging guides treat the client handoff as the final step before printing starts. We think that framing undersells what a great handoff actually does for your business.
When you run a professional, stage-gated handoff, you are not just getting files to a printer on time. You are building a repeatable operational asset. Every approval record, every version log, every pre-press sign-off becomes part of a system that makes your next launch faster, your negotiations with manufacturers stronger, and your relationships with co-packers more trustworthy.
Emerging CPG brands that institutionalize workflow discipline early consistently outpace competitors who are still figuring out their process by the third product launch. The speed advantage is real. When you already know exactly how your handoff process works, you cut weeks off your timeline. That translates directly to earlier revenue and lower carrying costs.
There is also a compliance dimension that most guides ignore entirely. Retailers, especially national chains, are increasingly asking for documented design and approval histories as part of vendor onboarding. Having a clean audit trail from concept to print is not just good practice. It is becoming a commercial requirement. The operational impact of a streamlined handoff reaches into your margin, your shelf placement speed, and your brand reputation with partners.
The deeper truth is that a messy handoff signals a messy brand. When your printer or co-packer receives a disorganized file package with no approval records and three versions of the same file, they form an impression of you as a business partner. A clean, complete, documented handoff signals that you run a serious operation worth investing in. That soft benefit compounds over years of repeat business, better pricing, and partners who prioritize your jobs.
Ready to simplify your packaging handoff process?
If you want to put these handoff best practices into action with less hassle, here is how Offcut can help.
Offcut exists precisely because CPG founders should not have to choose between great packaging and a manageable process. Our platform connects founders with print-ready, professionally designed packaging concepts that are built to meet handoff requirements from the start.
When you work through Offcut's packaging design platform, you get exclusive, production-ready concepts with the technical specs already handled, so your handoff conversation with a printer starts from a stronger position. For designers, Offcut's designer tools mean that great work gets used instead of archived. Whether you are refining your handoff workflow or starting your first CPG launch, Offcut gives you the infrastructure to move from concept to shelf with confidence and without the agency price tag.
Frequently asked questions
What is the most important element in a packaging design handoff?
Explicit, centralized documentation of approvals and final files prevents costly errors and delays. Centralized proofing creates a single source of truth and a complete audit trail every stakeholder can reference.
Which file specs are must-haves for print-ready packaging?
Files must be in CMYK, use 300 DPI, include bleed and safe zones, correct dielines, and properly embedded fonts and images. The standard pre-flight checklist for artwork files confirms each of these requirements before submission.
How can founders avoid duplicate feedback during the design review?
Use centralized version control so all reviewers comment on the same artwork iteration rather than separate copies. Centralized review systems eliminate the confusion that comes from parallel email threads with conflicting feedback.
Why do handoffs often fail at the printing stage?
Most failures result from missing or mismatched templates, incomplete pre-flight checks, or unclear file instructions for printers. Template mismatches and pre-press issues are among the most frequent causes of production holds and costly reprints.